Tuesday, 17 December 2013

Making New Cuddlies for 2014 - Part Two

Good evening everyone - Cy Bear taking over for this second installment, which may yet go into a third, depending on how my description of the process goes, and the number of pictures we use to illustrate the story.

Isobel left the last post at the point when everything needed to be put together:  so the next step is for all the bodies to be stuffed.  In the case of all Dressed Lady Cuddlies (whether they are Rabbits or Foxes so far in the www.ColdhamCuddlies.etsy.com story or new models in the 2014 pipeline) they all have two seams sewn at the point where the legs become hips in a normal person.  The first one at the top of the legs is a straight one and the second (about half an inch up the body) starts and finishes at that point on each side, and in between becomes slightly curved.  It means Isobel then can stuff the legs from the bottom upwards, and the body is then stuffed from the neck down!  Apparently that's a much easier (and faster) process than when she has to make the Men Toys. They have to be stuffed from the neck downwards, right to the bottom of the legs - which obviously have to be very stiff so that the finished Toy can stand tall and upright, hopefully without being propped up.


In the case of the Lady Toys, it means they can sit down easier too.


Once the shoes have been sewn on, the pantaloons are fitted.  In the case of the Brown Rabbits, they were made in light green poplin and edged with a cotton white trim.  Each pantaloon leg was gathered around the ankle using embroidery yarn, which was tied and knotted tightly.  Then Isobel gathered the material at the waist, arranged the fabric evenly around the Toy's waists and sewed the pantaloons in place at the waist as well.

Our Cuddlies are not made to be undressed - which we believe is the secret to their longevity.  Long-time Followers of this blog will recall the treatment of  Madame Lapin and Mons. Reynard (toys that Isobel made for her sister-in-law who lives in France nearly 40 years ago.  They both were treated in our Stuffed Animal Restoration Clinic (Etsy Listing #79124185) and their therapies described in our posts (for Mme Lapin these were dated 19/02/12 and 20/02/12 and Mons Reynard featured on 04/03/2012 and 07/03/12).  The only reason they became Patients with us was that they had both become dusty, and Mons. Reynard's stuffing and boots needed attention.  Now, after a bath and clothes wash for Mme Lapin and re-stuffing and brand new boots for Mons Reynard, they look as good as new, and are back in their accustomed positions on MmeIM's dressing table in Normandy.


Reverting  to the present:, the next photo shows one of the two White Lady Rabbits at the same stage - with the Black felt shoes in place and the pantaloons - this time made in white satin and trimmed with pink lace and gathered at the ankles with a purple embroidery yarn.  (She was actually being propped up to stand for this photo!


This shows Brown Rabbit with her trimming and gathering in place as well.  The pastel shades of both the trimming and pantaloons do not show up truly under electric light, as well as they do in daylight -  however, think you can get the idea!


Then come the dresses.  Each skirt actually comprises fabric that measures 10 inches (c.20.6 centimetres) from floor to waist and 36 inches (90.15 centimetres) wide.  That is quite a lot of material, which has to be gathered at the waist and sewn onto the bodies of each toy.  Before the gathering gets done though, Isobel makes a one inch hem and this time used the sewing machine, with a zig-zag stitch setting to make the hem, and at the same decorate the dress as well.  At the same time, the ColdhamCuddlies label is also stitched into the dress at the back seam.


Then the bodices are attached.  The arms have to be stuffed first of all, and then the bodice of each dress is fitted over the waists of each Rabbit, the seams turned under - quite a tricky move for someone with arthritic fingers such as Isobel at times - and then she sews the two pieces together at the waist.


Right, I've been told by Isobel that we're going to have to stop posting this story for tonight, because the space allocated by Blogger for the pictures is getting to the point that she will not be able to upload more of them and see what she is doing to get them onto the blog.  She says that there is probably a recognised way of doing this but to date she has not been able to fathom it out.  So, you'll have to wait until next time to see what happens  - but meanwhile, here is a photograph showing Brown Rabbit, waiting for her head, apron, carrot and collar to be attached - just to whet your appetites (I hope).


Until the next time - when I think I'm expected to carry on the story, while Isobel performs the actions in the background.

 Good Night.  Your Friend - Cy Bear

Saturday, 14 December 2013

Year end in sight: time to make new plans. Part One - Two New Cuddlies are here!

With Christmas 2013 almost upon us and the last Etsy orders fulfilled, and hopefully en route to reach their various destinations in time, it's now time to think about what is going to happen to www.coldhamcuddlies.etsy.com in 2014.  With that in mind, and realising that most of the Cuddlies models have been replaced/made in the same way since we started four years ago, - our anniversary is February 2014 -  when we had to make another Mrs. White Rabbit (Etsy Listing # 72168846) and a Mrs Brown Rabbit (Etsy Listing # 60491625) I decided that there would a modification in their appearance - to include a juicy carrot in a pocket in their respective aprons.

So, while undertaking this re-make, Cy  Bear and I decided it would be a good idea to show you how we went about this new project and this is how it went.


Each individual toy has 16 different pieces - from the skirt and top - including the arms and paws, via head (ears and all), the body- which is made separately from the clothing, and finally the apron, pocket and carrot pieces.  I decided to cut out four sets - two for the White Rabbits (seen in the back ground of the picture) and two set for the Brown Rabbits.  Readers will recall that this replacement was needed as we had an order to provide either a Brown or White Rabbit for MrsEB in Queensland, Australia.  I decided to make two of each, so that when the choice had been made, there would still be at least one of each in the Shop, before a further replacement was needed for fortunate Rabbit who had found a Forever Home.


The Brown Rabbits were to be dressed in Green Candy-striped Poplin and the White ones were made up in a Purple and White Striped/Floral Pattern which has been used for both our White and Grey Rabbits (Etsy Listing #63379098) to date, but will shortly not be available - because there is no more of it to be had!  These will have Green Felt Shoes to match the former's dresses, while the White Rabbits are going to have Black Felt versions.


(Running out of fabric is an occupational hazard when one is using off-cuts provided from my usual source in Frome, Somerset - The Fine Quality Feather Company, who are soft furnishing manufacturers with a seemingly endless supply of unusual plush faux furs and other interesting materials.  But it does also mean that one can vary the look of one's Toys as one goes along as well.  I've been lucky to date to have had the option of making several similar versions since first registering on Etsy).

To begin the construction process, and because I was making four sets of the same thing I actually decided to use my sewing machine.  That certainly sped up the process of producing the bodies, pantaloons, bodice, skirt and aprons. (It took me an evening to make the four sets, as well as the four bodies). Here the first two of each pair of Rabbits can be seen with their various bits sewn together before they get made into a finished Toy - first are those for White Rabbit.  (Once all the straight seams were done, I then reverted to my normal hand sewing activities.  It's much easier and far quicker that way!)


Next here are the same pieces made up for the Brown version.


You can see the clothing pieces are arranged on the left of the picture, with the body in the middle (with the carrot pieces ready to be stuffed and attached), then on the right of the photo are the head (rear), two ears, two shoes and the white fluffy tail.

This time around I decided to make the bodice in such a way that the paws and arms were slotted in once the front and back of each bodice had been attached at the shoulders.  The furry paws are sewn to the arms first, and then the arms are sewn in at the shoulder seams.  Then it is possible to sew the under-arm and side seams at the same time.  It results in a smoother look in the end.  You can see from the Brown Rabbit photo, that the pocket has been appliqued on to the apron, and the ribbon waistband attached.  I tidied up the side seams of the aprons with seam binding in the matching colour and when I made the skirts for each Rabbit, I attached the "Coldham Cuddlies" label at the back seam. (I cheated a little when doing the hems for both apron and skirt - by using the machine and stitching it with a wide button hole stitch, rather than hemming each item (a process I find extremely tedious when having to do it by hand!).

There is actually only one seam for each skirt, and I usually turn up the hems before attaching the skirt to the body, once that has been stuffed. The calico body has two seams at the place where the legs curve to make the hips.  One seam is a straight side-to-side and then - starting about half an inch (5cm) on each side from that straight seam, I sew a seam with a slight curve in it.  This ensures that the Lady Rabbits sit down, rather than stand - although in these cases, the material used for the aprons was sufficiently stiff to allow them to stand upright (at least for as long as it was needed to photograph the finished toys, anyway!)

Then comes the fun part - putting the various pieces together.  Now as I'm doing four Rabbits at the same time, and I don't want this post to be too long, I'm going to finish this post now - and complete the description of how the Mrs Rabbits are put together next time.

Until then - Good Night and Bless you all.   Isobel

Monday, 9 December 2013

More Cuddlies are on their way - as Christmas Surprises

While in the middle of getting ready to write and post the remaining Christmas cards (intra-UK and locally in and around where I live), I'm trying to do more than one thing at once - and not succeeding terribly well at anything!!  I'm running off my round robin letter - yes, despite everyone's scoffing about such missives, I find them a terrific way to keep in touch with friends and family and shall continue to do one every Christmas until I am unable so to do - but am getting myself muddled with the pages, because this year I've actually produced a two-sided offering, and I really didn't think it had been that eventful!!  I've just wasted several pages, because I didn't present the paper the right way to the printer so it could print the second side!   Oh well, c'est la vie!

Earlier today though, I spent time parcelling up the last two Cuddlies to be sent off in time to reach their destinations before Christmas.  One, as Cy Bear told you in our post last week, is off to Louisville, Kentucky where MsMK is hoping to receive a pair of Ladies Slippers based on our Mens Badger Slippers(Etsy Listing #158936304) to fit a small lady's foot.  Because the original was trimmed with a sober brown satin ribbon I decided that I'd try to find a more feminine decoration - and this is what they've turned out like.


I'm rapidly running out of Badger striped fabric, alas - although there is plenty of flecked plush fabric that will meet the needs of a Badger's body in future.  There was enough to do the two slipper sides for this pair of slippers, and because no heads were required on these particular Slippers, I was able to use some of the flecked fabric for the front panels.

 However, there may be an order for the Mens' Version in the offing.  It's from a London UK source, but the Buyer wants to have heads on them.  They were originally made to show what a pair of Cuddlies  Slippers for Men would look like without any!  I'm waiting to hear back, because I feared there would not be enough for two more heads, but did offer to make them with different plush fabrics.  But since the correspondence began earlier today, I have discovered a small stash of striped fur and have told the prospective buyer.  Now am waiting to see if she gets back tonight.  It will take me a couple of days to make the two heads and fix them to the original Mens' Slippers, but a  Size 10 Man's model was requested - and that is what we have!  The final guaranteed posting date for UK parcels has still got a way to go

Meanwhile, here are some more shots of the Ladies' version from different viewpoints:

The Slippers from the rear


This one is taken with both slippers sideways on and here is one of the left foot slipper head on.  


The ribbon this time is actually a cotton one, with red check background and red flowers embroidered on - it's rather an attractive ribbon which came from one of my friends, who has had to give up her sewing due to failing eyesight.  There are similar amounts of ribbon trim in my stash, made with the same cotton ribbon and similar decoration, but in Pink and Pale Blue.

Also due to be dispatched to a London destination is a pair of Childrens' Slippers made for a lady from Heytesbury village who divides her time between England and Australia.  She wisely spends the UK winter months in the Southern Hemisphere and comes back to the UK for our spring and summer.  Earlier this year MrsCB purchased a pair of my Fox Head Small Size Slippers for Kids for an Australian grandchild - because they don't have Foxes in Australia.  So, for this Christmas, while she was away in Australia, before leaving for the Antipodes, she ordered a pair of Small Child's Slippers made with Koala Heads, because of course, we don't have Koalas in England.  This what they have turned out like.


The pattern for the heads is the one used for my Small Tree Bears (which is another name for a Koala in Cuddlies' Family-speak anyway) whereas the pattern used for my  Koala Headed Mens' Slippers (Etsy Listing #158098231) is actually that for a small Baby Dressed Bear, which is a toy that has yet to feature in the Cuddlies Family.  When placed side by side, they don't really look that dissimilar, do they?


Perhaps the Mens' version have larger ears, and the heads are bigger, but then they should - so they remain in proportion with the difference in feet size!


Meanwhile, back with the Children's Koala Slippers, this them from the rear and this next picture is a close up of the ribbon trim - a satin pink spotted ribbon which I found when recently staying with Philippa in High Wycombe (having omitted to take trimming with me to complete my sewing while I was away).  I have to keep sewing every day, otherwise my fingers really do stiffen up, and it can be the very devil to get them going again!!


Both pairs of slippers are now wrapped up and ready to be posted on my way to Zumba tomorrow morning.  The Childrens' Slippers are wrapped in Christmas Paper and bubble wrapped, with a card written by MrsCB contained in the Christmas parcel.  A covering letter to the Little Person's parents - without letting them know what is in the parcel, in case MrsCB hasn't told them to expect slippers! - is in an envelope, stuck onto one side of the parcel (forming the address) just to make sure it gets to the intended destination in good time.


Before they were prepared for their impending journeys, Cy Bear insisted that they be given the traditional farewell ceremony with him supervising - just to see that they meet his stringent standards!


Well, in the time that I've taken to input this post, the printing for the Christmas card enclosure is almost done:  so I've utilised my time productively this evening!  Now have got to edit this and publish it before going to bed.

By the way, this blog has reached a milestone in the last few days.  The last time I checked, earlier today, we have had 20,034 views since we began our ColdhamCuddliescalling saga in March 2011.  When compared with some viewing figures of other blogs perhaps that's not many:  but to my way of thinking, it's not bad!  

Closing down now - hope everyone is getting ready for Christmas without too much of a fluster.  Nice to be chatting once again.  Isobel

Thursday, 5 December 2013

Christmas is coming........Cuddlies are away to their Forever Homes!

Hello once more everyone!

Isobel has just returned after a short stay with Philippa, and now she's really got to get down to sewing and meeting all the Christmas orders, as well as those that were postponed until Christmas orders were completed!

There seems to have been a rush in the past few days, and today, we're sending two Cuddlies on their way to their new, Forever Homes:  two more are scheduled to be off shortly and we thought you'd like to see some of them, as well as those already en route.


These were the Cuddlies whose destination was the home of MrsEB at the delightful address of Sunnybank Hills in Queensland, Australia.  The Pink Fleece Baby Rabbit, with its white front (Etsy Listing #166947912)  is going as a "Welcome to the World" present to a little girl due to arrive sometime in the New Year.  Mummy Rabbit (Etsy Listing #60491625) is going to little girl's Mum and the Panda Bear Glove Puppet (Etsy Listing #91356474)  is being sent so that Dad can keep Baby amused and give her Mum some respite:  at least that is the plan!

There's always a lot of mixed feelings on these occasions.  Whilst Isobel and I are always pleased that our Cuddlies have found Forever Homes, we know we're going to miss them when they go.  So, if I'm looking a little solemn in the photograph above, that is the reason.


Here are the other three recent Replacement Rabbits making sure that I know what I'm doing!  Of course I do!  I'm just checking that Isobel has got all the needful pieces of paper on the parcel before she takes it to the Post Office.  It's not just a case of checking that the address is correct, you know:  we have to put our own address on, so that the parcel can come back if it can't find its way.  Then Isobel always puts a "Fragile" label on every envelope.  Even though Cuddlies are all plush or fabric toys - and therefore unlikely to break en route - international travel can be hazardous and uncomfortable, and we do like to try to ensure that our friends are as carefully cushioned from being hurt as we possibly can.  I have heard that parcels do get thrown about, and I'm jolly glad I stay safely at home on these occasions.

Then we have to put an Air Mail sticker on every envelope (Isobel likes to put a sticker on both sides, so that the post men can see where the way the parcel is meant to go whichever side happens to be facing them when they are handling them).  It would take even longer than it already does for a parcel to reach Australia if we didn't put that sticker on our parcels.  Finally, the last piece of paper that has to go on all our parcels (except those going to European addresses) is the Customs Label. We just have to put what the parcel holds and the value of the contents.  That's for the Customs authorities in each country to which the parcel is travelling, so that they don't have to open it up to make sure what is inside it.

This parcel left England last Friday (November 29) and we're hoping it will reach Queensland in the next two weeks.  Even though it is not needed until next year, that is now only 4 weeks away, I'm told, and the Christmas Festive Season is now upon us - which means there could be delays in parcels getting through to where they are meant to go.

Then today, Isobel took two more parcels to the Warminster Post Office - which is where most of us Cuddlies are handled when we leave for pastures new.  Our Village Post Office can only take really small Small Packets - as we are categorised - so it's easier for us to be taken to either Warminster Post Office where they can handle ALL SIZES and shapes - or Codford Post Office (which is in the other direction, and is on the way to Isobel's weekly Zumba classes).  These two are destined for different addresses in America - one in Texas and the other in Virginia.


Grey Bunny on the furthest right of this photograph is the one travelling to Winchester, Virginia later today.


While it's the Lady Fox (Etsy Listing #65456642) in the centre of this picture, with the yellow ric rac trimming to her dress that is wending her way to Richmond, Texas.

Here they are lined up for their final photo before being wrapped up in their individual tissue paper and bubble wrap travel protection.


The Leopard Slippers (Etsy Listing #156616186) are actually not now travelling.  They were needed for a specific task - appearing in a play apparently - and had to be at their destination by December 16.  Alas, international postal services are not known for being the most reliable, especially when there is the likelihood of delays during the VERY BUSY Christmas period.  So, when Isobel pointed out that she could not  GUARANTEE the Leopards would get there for that specific date, and the buyer was not prepared to pay the extra postage cost to ENSURE they would, it was mutually decided to cancel the transaction.  No wonder Left Slipper is looking just a little disappointed:  although all of us are pleased that the decision was made in time for no recriminations on either side had we not had that discussion! Wouldn't it have been awful if we'd sent the Slippers and they hadn't arrived on time?

That's it for this dispatch (pun not intended!).  Hope to be back here again very soon - we've been a bit bad about posting on this blog (again, pun not intended!) just recently, but we've both been very busy!!  Hope everyone is well!  Your Friend Cy Bear

Sunday, 24 November 2013

Goodness me - just how the time flies!

Greetings to everyone!

It is some time since an entry was made on this blog, but just how long has only been revealed when  arriving here a moment or so go and saw just HOW LONG it has been since either Cy Bear or I have been here.  My apologies, but until I have figured out how to sew and type at one and the same time, something has to give - and I am afraid it has been ColdhamCuddliescalling.blogspot.com!  I will try to improve, but cannot promise.

However, my sewing has had to be at the forefront in recent weeks, as regrettably, with the almost complete focus on creating the 2013 Coldham Cuddlies Novelty Slipper Campaign during the summer, some sales took place - locally in Heytesbury and surrounds.  They were then duly renewed in our shop at www.Etsy.com/shop/coldhamcuddlies.  The problem was that I omitted to replace the items that found their Forever Homes - as I usually do when the renewal process takes place.

 In the last week or so, three items were suddenly ordered (after a barren period on the Etsy sales front) and alas, all three were not available immediately.  I fear my stock control system has been found wanting - although, as my kind Buyer pointed out, I have been lucky to have those sales in the first place.

So, to begin with, there was an urgent need for Panda Glove Puppets (Etsy Listing 91356474).  That urgent need was quickly fulfilled over a week-end, as they don't take long to do.  So, it occurs to me that a post about how the replacements were achieved might well be in order - so here goes.


Making a glove puppet the way I now do hasn't varied too much from when I posted about them many months ago when they first featured in the Coldham Cuddlies Family listings.  However, I've now developed a way of doing multiple versions at one and the same time, and in the case of these fellows, it worked quite well.

Basically, each Glove Puppet Head consists of two side panels and a gusset, two pairs of ears (in contrast black plush fabric), two felt black patches through which the safety backed eyes are then fixed.  In the case of the Pandas, the arms are also made with the contrast Black Plush fabric and then sewn to the body in the appropriate places.


This picture shows both Glove Puppets, complete with their heads - with the eyes (blue plastic safety backed ones in this case) attached through the felt eye patches and then both heads having been stuffed with our usual, washable polyester fibre filling.  In the middle, between the two glove bodies you see the finger guides.  I roll up some cardboard - approximately 2" long (5 cms) which I then stitch in place to keep the roll together. Stapling, were it to be practical, is not recommended - because they could then scratch the Puppet handler!  They are then covered with calico, which is also then stitched in place - this results in a more comfortable finger guide, and hopefully will give it a longer life when in use as an Activity toy.

 (I have lots of calico to hand, because my polyester fibre comes in pillow case sized bags and are kept for such purposes - as well as for making the bodies of my dressed Gentlemen and Lady toys).


Before going any further, I have recently begun to do the facial features of all the Cuddlies before going any further in the construction process. (I'm finding it is easier for my increasingly arthritic fingers and hands to cope in this way - rather than in the way recommended by the original patterns.)   So, once the eyes were in place, the the nose and mouth were embroidered - removing some of the fabric pile in the nose area.  Otherwise there can be a problem with it getting caught up in the thread.  It's a time-consuming process, removing the pile from the thread - and can result in some choice words being uttered.  (I leave that to the imagination of my lovely Followers!!)

The covered finger guides are then inserted into the neck area of each Panda Head and firmly stitched in place.  Then the Head is inserted into the Glove body area, and attached to the body around the bottom of each Panda Head.  Then I get a wire brush and "groom" each Glove Puppet so they look smart and shiny and ready to be played with.

In the case of this order  - which is destined for Queensland, Australia - I then sent some pictures so a selection of precisely which Glove Puppet was preferred could be made.


Without having the correspondence between us to hand, I'm not absolutely sure which one was eventually selected, but I believe it is No. 2.  Suffice to say that when the selection was made, he was put in a plastic bag (to prevent unnecessary exposure to the elements), together with the already selected Pink Baby Bunny.

The rest of my time has been spent in sewing two each of Grandma White Rabbit (dressed in a Purple Floral Print dress) and Brenda Brown Bunny, who comes with a Green Candy-Stripe dress.  Both of them had been sold during the summer, and, alas, needed to be replaced.  Two are already completed, two more will be sometime tomorrow.  There will then be another photocall - so that MrsEB, my very patient Buyer, can choose which she would like to have. (She was having difficulty in choosing between the White and Brown Plush versions at the last count).

(When the order first arrived earlier this month, I had the impression that it was needed urgently:  fortunately as it has turned out, the imminent arrival of her friend's baby girl does not take place until next year, so this time I've not caused a major problem.)

It's been a well learned lesson for me though!  Do not renew, unless a replacement is already in place!!

I'll be back again with a post about the replacement Dressed Lady Rabbits - whose design has been updated somewhat - although they do basically remain the same.  Oh, I'll also include a brief report about the very successful Christmas Present Sale which took place on Saturday, November 23.  One of our Frogs (Etsy Listing #116285186) found a Forever Home in the Village, as did another Pink Baby Bunny.

Until then, I'll end this post in the hope that everyone is enjoying getting ready for the rapidly arriving holiday season - starting with Thanksgiving in the US next week!

Good night - and God Bless.  Isobel

Wednesday, 13 November 2013

A Gathering of Golf Club Head Covers - and how one was made

Hello Everyone:

Cy Bear back again, because Isobel is busy doing other Etsy type things, and is letting me tell you how Tiger Head Golf Club Cover was made, and - since they are all made the same way - showing you (and maybe, reminding you) of some of our other Golf Club Head Covers at the same time.


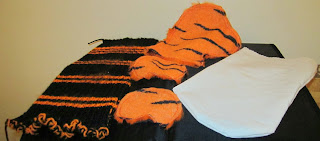
This is how both the Tiger Head Covers I showed you in our last post look like at the beginning.  There's the knitted handle cover, the two ears in the middle front foreground, with the head ready to have the eyes put in behind them, and then the white calico lining which surrounds the golf club head when it's pushed over it.


Before going any further, the safety eyes are put in place and fixed.  All our Toys' eyes with safety backings are as tight as these.  So the only way they could be taken out is for the total eye to be pulled out and leave a major hole in the fabric.  Isobel can only fix these backings using a pair of pliers, and it results in a very close fit.  It would have to be a really persistent person who would succeed, after a lengthy interval - and most Little People would have lost interest in the attempt well before that point arrived!


Here we have the calico lining stitched in place (Isobel tacks it along the centre of the head on the reverse side of the head) waiting for the stuffing for the head to be inserted between the lining and the plush outer cover.  This is why the lining has to be the length it is.   We don't use as much stuffing for Golf Club Head Covers as one does for the Cuddlies Toys, because there has to be room for the Golf Club itself to fit into the interior of the Tiger Head - thus resulting in something looking like this - with a very soft, squashy feeling:


Next come the addition of the ears and embroidering of the nose.  We cut the plush close to the pile in the area where the nose will be sewn.  One can get plastic noses, I believe, but Isobel prefers to sew them on - they're softer to the touch in her view.  The Tiger Head is now almost complete.

Front View of the Tiger Head Cover
Here we have the Tiger Head cover shown from the rear, together with the Coldham Cuddlies label to provide the provenance for the finished article.


Then we fix the knitted handle around the top of the lining and Isobel sews it firmly in place around the neck of the Tiger Head.  She then sews the seam to form a tube - and because the knitting tension is quite loose, she is able to pull it over the Golf Club Head to finish looking like this:


With a close-up view of the finished Tiger Head Golf Club Head cover to end this section of the post.

Etsy Listing #168592299
While I am here,  however, we thought you might also like to see the other Golf Club Head Covers we have in stock at www.Etsy.com/shop/coldhamcuddlies.  As I said earlier, their construction is always the same, so there's no need to repeat the stages described earlier in this post.

First we have the Panda Bear Head Cover:

Etsy Listing #107241362
Then there is the Yogi Bear Golf Club Head Cover

Etsy Listing #107242111
Followed, finally, by the Golden Bear Head Cover

Etsy Listing #107240612
If any one wants to have a special Christmas Stocking Stuffer gift for their golf-mad partner or sibling, Isobel would be more than happy to provide one with any of the animal heads available in our Etsy shop (www.Etsy.com/shop/coldhamcuddlies).  These could include a Beaver, Badger/Wombat, Fox or Rabbit for starters.  They don't take long to produce - these Tiger Heads were created over three days last week-end for example, although the knitted handles had been done separately, and took about three days to do them both - so each finished item would probably require three days each to complete.

Right, that's enough for tonight.  Hope you are all having a great day/evening - depending on what time of the day you are reading this post.  See you soon, I hope.  Meanwhile, Goodnight and God Bless.  Your Friend - Cy Bear.

Saturday, 9 November 2013

Tiger Head Golf Club Head Cover - latest Cuddly to hit the ground running

Hello Everyone:  Cy Bear here once again having been allowed to take over the introduction of this latest Golf Club Head Cover, which has been listed in our Shop at www.Etsy.com/shop/coldhamcuddlies earlier today.

Etsy Listing #168592299
These Tiger Head Golf Club Head Covers are the result of a specific request from a customer with a young golf-mad friend.  One of them is destined to be his Christmas present this year.  Given the association of Tigers with Golf, it is anticipated that they could prove a popular addition to the Coldham Cuddlies Family.

The Tiger Head on the right of the picture is stuffed with one of the knitting yarn cones we use for keeping our Glove Puppets upright - which is why it looks somewhat shorter than the Tiger Head in the foreground.   Finding suitable means of displaying our collection of Golf Club Head Covers en masse is presently exercising Isobel's mind - especially with our next Craft Fair coming up in two weeks' time.

This Orange Animal Print Plush Tiger Head uses as its template the heads already used for our Long Legged Tigger Toys  (https://www.etsy.com/listing/108763404/tiger-print-plush-toys-boys-or-girls? ).   They are made specifically for covering the Heads of Wooden Driver Golf Clubs.  Each one is lined and lightly stuffed to provide extra protection for the woods.  The knitted handle cover is sufficiently long to provide protection for the metal club handles against chafing caused by movement within the Golf Club Bag, while being caddied around the golf course.  This Orange Tiger Head  Plush cover is modelled on a No.1 Wood, but has sufficient room for bigger clubs if required.

The Club Handle cover is Handmade, using Black and Orange Double Knitting yarns, using  a Double Rib striped pattern for the 12" (31cm) length of the cover, and the Tiger Head is lined with White Calico sheeting material,.  The ColdhamCuddlies label is attached inside the head to provide the requisite provenance.


The weight is negligible, so they will easily travel at the Standard Small Packet rate charged by UK Royal Mail.  They will also not add greatly to a larger Toy's travel charge if they are required to accompany them.

These Golf Club Head Covers are a popular branch of the ColdhamCuddlies Family - born of a suggestion made by a Lady Golfer of my acquaintance, who is this year's Lady Captain of her local Golf Club in Nottinghamshire, England, UK.

The No.1 Driver Club has been donated to enable to me produce other Head Covers in future, and the original  owner has been good enough to provide a customer test of this particular cover.  His verdict?

 "Splendid:  my hand (a big fist!) fits in comfortably:  it means a bigger club than this one will have no trouble in fitting in either.  The knitted handle demonstrates sufficient elasticity to be able to cope with getting a regular dousing when the elements are not being helpful when playing on the golf course!"


This is a sideways, frontal view of the Tiger Head Golf Club Cover before his nose had been embroidered and his ears fitted;  and to finish the photograph show here is one of the Tiger Heads modelling the full length Golf Club.


Isobel intends to give a blow-by-blow description of how these Tiger Heads Golf Club covers are created - as is her wont - sometime in the next few days.

Meanwhile, she's off to cut out and sew two replacement Panda Glove Puppets (Etsy Listing #91356474) - one of which now has his Forever Home allocated (in Queensland, Australia).  Earlier this week, we received an order from MrsEB - a fellow Member of one of the Etsy Teams Isobel frequents each day.  Not only will Panda Glove Puppet be travelling to Sunnybank Hills (isn't that a wonderfully evocative place name - especially when I look outside my window and see the rain teeming down here in the UK!!), but so too will one Pink and White Baby Bunny (Etsy Listing #166947912) and Grandma White Rabbit (Etsy Listing #721688846).  I'll leave Isobel to tell you the exact proposed  distribution of the trio in her next post - but meanwhile, I'll end this one by wishing you all a great week-end.

Your Friend - as always.  Cy Bear