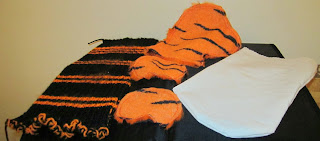
Cy Bear back again, because Isobel is busy doing other Etsy type things, and is letting me tell you how Tiger Head Golf Club Cover was made, and - since they are all made the same way - showing you (and maybe, reminding you) of some of our other Golf Club Head Covers at the same time.
This is how both the Tiger Head Covers I showed you in our last post look like at the beginning. There's the knitted handle cover, the two ears in the middle front foreground, with the head ready to have the eyes put in behind them, and then the white calico lining which surrounds the golf club head when it's pushed over it.
Before going any further, the safety eyes are put in place and fixed. All our Toys' eyes with safety backings are as tight as these. So the only way they could be taken out is for the total eye to be pulled out and leave a major hole in the fabric. Isobel can only fix these backings using a pair of pliers, and it results in a very close fit. It would have to be a really persistent person who would succeed, after a lengthy interval - and most Little People would have lost interest in the attempt well before that point arrived!
Here we have the calico lining stitched in place (Isobel tacks it along the centre of the head on the reverse side of the head) waiting for the stuffing for the head to be inserted between the lining and the plush outer cover. This is why the lining has to be the length it is. We don't use as much stuffing for Golf Club Head Covers as one does for the Cuddlies Toys, because there has to be room for the Golf Club itself to fit into the interior of the Tiger Head - thus resulting in something looking like this - with a very soft, squashy feeling:
Next come the addition of the ears and embroidering of the nose. We cut the plush close to the pile in the area where the nose will be sewn. One can get plastic noses, I believe, but Isobel prefers to sew them on - they're softer to the touch in her view. The Tiger Head is now almost complete.
 |
| Front View of the Tiger Head Cover |
Then we fix the knitted handle around the top of the lining and Isobel sews it firmly in place around the neck of the Tiger Head. She then sews the seam to form a tube - and because the knitting tension is quite loose, she is able to pull it over the Golf Club Head to finish looking like this:
With a close-up view of the finished Tiger Head Golf Club Head cover to end this section of the post.
 |
| Etsy Listing #168592299 |
While I am here, however, we thought you might also like to see the other Golf Club Head Covers we have in stock at www.Etsy.com/shop/coldhamcuddlies. As I said earlier, their construction is always the same, so there's no need to repeat the stages described earlier in this post.
First we have the Panda Bear Head Cover:
 |
| Etsy Listing #107241362 |
Then there is the Yogi Bear Golf Club Head Cover
 |
| Etsy Listing #107242111 |
Followed, finally, by the Golden Bear Head Cover
 |
| Etsy Listing #107240612 |
If any one wants to have a special Christmas Stocking Stuffer gift for their golf-mad partner or sibling, Isobel would be more than happy to provide one with any of the animal heads available in our Etsy shop (www.Etsy.com/shop/coldhamcuddlies). These could include a Beaver, Badger/Wombat, Fox or Rabbit for starters. They don't take long to produce - these Tiger Heads were created over three days last week-end for example, although the knitted handles had been done separately, and took about three days to do them both - so each finished item would probably require three days each to complete.
Right, that's enough for tonight. Hope you are all having a great day/evening - depending on what time of the day you are reading this post. See you soon, I hope. Meanwhile, Goodnight and God Bless. Your Friend - Cy Bear.


